Facebook recently launched the new Timeline feature to all its users. While most of the users loved the new update like always there were some who didn’t quite like it. One of the major reasons for the dislike was the complicated interface.
So, if you are one of ‘em who think that the new timeline feature is a bit too complicated, here are 5 nifty tips to get you started.
1. Get a Nice Cover Image for Facebook Timeline

Cover Image is a very new concept introduced with the new timeline view. A cover Image, just like a magazine cover, speaks about you, and thus you must not neglect it. Though you can upload and customize the cover image manually, if you are looking for some special effects with the ease of editing, you can try CoverCanvas. It’s by far the best I have come across.
2. Hide The Past from Facebook Timeline
With the new timeline feature, all the older posts and updates you made years back will be easily accessible. As years back there was no provision in Facebook to mark your updates as friends, friends of friends and public – all your older posts become public by default.

Thus, the first thing that you should do after activating the timeline in your profile is to make all your older posts private. To do so, click on the dropdown arrow near the home button and click on Privacy settings. In the privacy settings page look for Limit the Audience for Past Posts and click on Manage Past Post Visibility.
Now click on the button Limit old posts in the new dialog box to hide you all public updates you made in your past.
3. Add Life Events on Facebook Timeline
After the timeline feature was introduced, Facebook is now no more a simple social-networking service, instead, it’s like your biography online. You can now add your life events to Facebook like your convocation date, your first anniversary, the day you got promoted, the day you brought your first car or bike. Let it be any event and Facebook lets you share it with your friends.

To create an event go to your timeline view and click on the Life Events button next to the update status button. Now add your desired event to your Facebook profile and share it with your friends.
4. Feature your Posts on Facebook Timeline
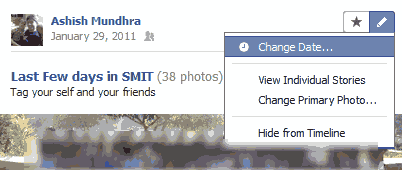
In the timeline view, a post is shared in a two-column newspaper-like format. They are trimmed to occupy the left or the right half of the screen. If you would like to highlight any story in your timeline and would like to feature it occupying both the columns, just click on the star button located above the update.

Your post will now be expanded to use both the column in your timeline view thus featuring the story.
5. Change Album Primary Photo
In the new Facebook, whenever you upload a photo album to your profile, it automatically selects an image as the cover image for your album.

Now, if you want to change the image with another existing image in your profile, click on the small pencil near the star button at the top right of the update and select Change primary photo. Select the new primary image and select OK.
Conclusion: I am sure, with these nifty tips you will be able to make the most of the all-new Facebook timeline. Don’t forget to share your experience with the all-new timeline feature.
Guest author Ashish Mundhra is Editor at WorkYourOffice and is an enthusiast in the field of technology.